These paddles are in the style of.
They are not replicas or meant to be definitve in any way

|
These paddles are in the style of.
They are not replicas or meant to be definitve in any way
|
|
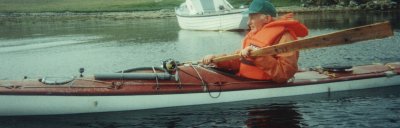
| In my humble opinion Eskimo
or Aluet style paddles are preferable to the 'conventional' high tech 'river'
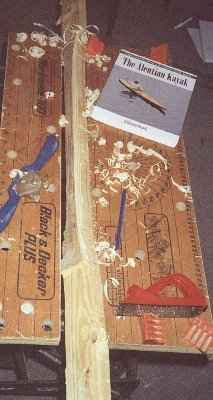
paddle for sea kayaking. To this end I decided to build my own. Fortunately many kind souls in the newsgroup rec.boats.paddle sent me information. Thank you. The material used for the first two paddles was scaffolding board. These had been used on the oil rigs in the North Sea so I assumed they must be well weathered.
|
|
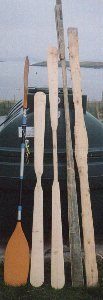
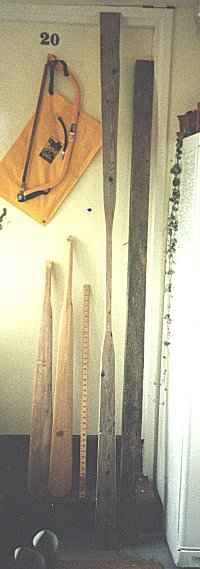
These two pictures above show a conventional paddle then
a Greenland style short Storm Paddle. After that is the first paddle I made
- a Greenland style paddle. Next to that is an oar from an ocean going Shetland
rowing boat called a 'yoal' or 'sixareen' or 'sixern'. The important thing to
note is the blade shape - it is long and thin. The blade shape used by the kaykers
from the Aleutian Isles to Greenland for work on the sea.
At the right is a plank in the process of being converted in to a paddle.
| Eskimo/Aluet style Sea Kayaking Paddle
- A method of construction
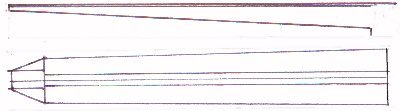
This is the method I have hit on using information from the paddling e-community Size the paddle - Conventionally the length
of the paddle is found by standing flat on your feet and raising an arm
above your head. From the tips of your fingers to the floor is the paddle
length. Other wood sizes - The width of the wood has to be at least 4 inches and the thickness 1.5 inches |
![[Picture]](Pad_plan.jpg) |
Marking out - Remove
any nails or staples from the wood and pick one of the flat faces. Draw
a line down the middle lengthwise and then draw a line across the face at
the mid point of the length.Then take a stick and hold it at one end then
just use the other hand to hold the stick ![[Picture]](Pad_loom.jpg) approximately
shoulder width apart. Note the distance from the outside of the hands. Return
to the plank and mark off on the centre line from the mid point half the
length just measured. Then do this for the other side of the centre point.
At these two points either side of the centre draw a line across the board.
These two lines define the loom length. To get its thickness draw a line
three quarters of an inch eitherside of the centre line between the loom
end lines. These are the loom lines. Then on the lines that define the ends
of the loom put a mark three quarters of an inch further out towards the
edge of the board from the loom lines. After that put a mark on the loom
lines two and a quarter inches from the loom end line. Join this point an
the previous point you made with a line -- Your getting confused! approximately
shoulder width apart. Note the distance from the outside of the hands. Return
to the plank and mark off on the centre line from the mid point half the
length just measured. Then do this for the other side of the centre point.
At these two points either side of the centre draw a line across the board.
These two lines define the loom length. To get its thickness draw a line
three quarters of an inch eitherside of the centre line between the loom
end lines. These are the loom lines. Then on the lines that define the ends
of the loom put a mark three quarters of an inch further out towards the
edge of the board from the loom lines. After that put a mark on the loom
lines two and a quarter inches from the loom end line. Join this point an
the previous point you made with a line -- Your getting confused! |
![[Picture]](Pad_loo3.jpg)
Blade width is a matter of choice. The
first I made was rather wide. So you will probably start off with 4 inches
plus and if you decide to make another blade the blade width will be reduced.
The anthropomorphic method is to hold the thumb and first finger of your
left hand in a wide 'C' shape trying to keep them as ![[Picture]](Pad_bla.jpg) parallel
as possible. The inside distance is the width of your paddle blade - the
width you can grip. For me the blade should be about 3 and a half inches. parallel
as possible. The inside distance is the width of your paddle blade - the
width you can grip. For me the blade should be about 3 and a half inches.
If you try extended paddle strokes such as some of the Greenland sculling braces then the paddle width will be crucial to your confidence and comfort. |
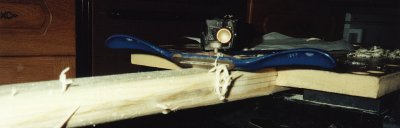
Now you have a plan view
of your paddle shape laid out on the plank. So now cut out that shape. I
usually start with the loom using a saw![[Picture]](Pad_adz.jpg) ![[Picture]](Pad_loo2.jpg) and a chisel. I use an adze to do the sides of the blades - it is more difficult
than using a saw but gives you a feel of what it must have been like for
Inuits to construct a paddle. So now you have a paddle
in plan view.
and a chisel. I use an adze to do the sides of the blades - it is more difficult
than using a saw but gives you a feel of what it must have been like for
Inuits to construct a paddle. So now you have a paddle
in plan view.
Now you have to draw the blade
thickness on the edge of the paddle. You have control here on how hefty
the paddle is. The thicker the blade the heavier it is. I use 1 inch at
the loom and quarter inch at the tip. 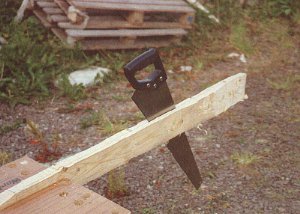 you
have to cut the slope of the blade from the tip to the loom. This can
be a real bind. I have tried it with an adze and got very fed up. A saw
is the answer but takes a long time. A circular saw will do the job but
has to be cut from both edges as most only cut to 2" depth. you
have to cut the slope of the blade from the tip to the loom. This can
be a real bind. I have tried it with an adze and got very fed up. A saw
is the answer but takes a long time. A circular saw will do the job but
has to be cut from both edges as most only cut to 2" depth.
I haven't used one but a power plane might be a good power tool for this job. But why use power tools? This is a hand made paddle! (Though you will curse this idea at times!) |
 You
now have the paddle blank. All the gross work has been done. Now to the
bits I enjoy You
now have the paddle blank. All the gross work has been done. Now to the
bits I enjoy
The next thing I tackle is shaping the loom. For the Greenland style it is usually an oval with its long axis at 90 degrees to the width of the blade. I have seen it written that the loom was sometimes the square section with the corners rounded off. I tried this with my first paddle It wasn't bad and gave a good grip in the hand but you have to size it to ensure it is not too big for you. The loom I do now is geared around the blade that
is worked on one side, the Aleut style, and consists of a half oval on
the worked side of the blade and a rounding of the corners on the none
worked side - front face.
|
 Now
that the basis of the loom has been shaped it is time to start on the blades.
Firstly I redraw the centre line down the sawn side of the blade. Then I
draw parallel lines at half an inch either side of the centre line. Then
on the blade edges I run a line parallel to the front face. The distance
from the front place depends on how thick your blades are going to be. I
run a line at an eighth inch but the oar I have has a much thinner blade
so I will try a sixteenth inch, or less, in future. Now
that the basis of the loom has been shaped it is time to start on the blades.
Firstly I redraw the centre line down the sawn side of the blade. Then I
draw parallel lines at half an inch either side of the centre line. Then
on the blade edges I run a line parallel to the front face. The distance
from the front place depends on how thick your blades are going to be. I
run a line at an eighth inch but the oar I have has a much thinner blade
so I will try a sixteenth inch, or less, in future. |
| The blade tips can be curved if you
wish. But if you look in George Dysons book you will see that some blades
were shaped to a point. [picture of blade ends required] Once you have done that you have a rough paddle. Continue working around the blades and loom until you think you are happy that there is nothing more to remove. I know it sounds weird but when to stop working on the paddle is subjective.
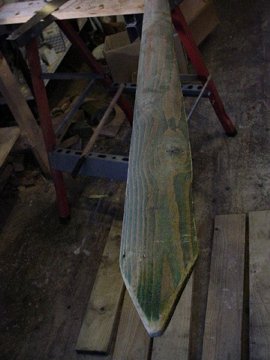
Finishes Some paddles have had no finish at all. They survive okay. Others have had linseed oil rubbed in. The paddle sheds the water but the finish gives a sticky feeling to the paddle. The finish also wears off at the hand positions. I have tried a single coat of wood preservative in a nice green. It appears to be working well but is not very traditional. |
 |
And one of the most important things is to go and
use your paddle. Don't get hung up on perfecting the perfect paddle.
In use the 9 foot paddle had a slow cadence and at sprint speed has as much pulling power as those with modern paddles but it was too long so now it is only 8 foot long and I have changed the ends - it works for me.
|
![[Picture]](Pad_pad1.jpg)